Contact Info
WINNIE User Tips
The following are tips, reminders, questions, and lessons learned from local agency staff currently using WINNIE.
TOPICS: Account Balance | Adjust Benefits | Benefit Issuance | Calendars | Certification Mode | Food Prescription | Logging in | Navigation Shortcuts | Participant Folder| Prescreen| Risk Factors | Scanners | Scheduler | Screen Real Estate | Session Settings | Signature Pad | SWIPe | Training Environment | Where is...? | WIC Card |
Account Balance
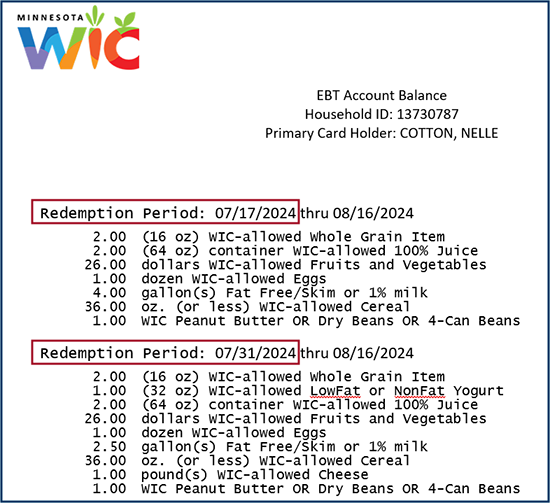
Account Balance Displays Food Items by First Date to Use (FDTU)
The Account Balance is a real-time snapshot of a household’s aggregated food items. The quantities show the current amount after any purchases have been made.
In WINNIE, the Account Balance shows food items by Redemption Period of FDTU thru Last Date to Use (LDTU). These are the actual dates during which a household can purchase the food items. When benefits are added or adjusted, any food items issued on a different date and having a different First Date to Use (FDTU) will display separately.
Adjust Benefits
Adjusting Benefits for Mom when Breastfeeding Status Changes
Adjust Benefits allows you to alter the food package once benefits have been issued, and you can use Recover to exchange one item for another. However, we have seen a couple of instances in which all food items issued for future benefits have been recovered and not replaced while adjusting benefits.
Breastfeeding Status Changes and Still Eligible for Food Benefits: If mom’s breastfeeding status changes, impacting her food prescription, and she has already been issued current and future benefits, you should assess whether redemption has occurred for the current month in Adjust Benefits.
If there is any redemption for the current month, leave her current set of food benefits as is, and use Adjust Benefits to void her future benefits. You can then reissue her future benefits with her new food prescription on the Issue Benefits page.
Best Practice: If mom’s breastfeeding status changes and she has already redeemed benefits for the current month, leave her current month as-is and void and reissue her future benefits.
Breastfeeding Status Changes and No Longer Eligible for Food Benefits:If mom’s breastfeeding status changes so that she is no longer eligible for food benefits (to Some-Breastfeeding or Non-Breastfeeding), void any future benefits with a Printed First Date to Use (PFDTU) after her new Cert End Date/Categorical Ineligibility Date.
Best Practice: When mom’s breastfeeding status changes so that she is no longer eligible for food benefits, any benefits with a PFDTU after mom’s new Cert End Date/Categorical Ineligibility Date should be voided.
Recovering vs. Voiding Benefits
Adjust Benefits allows you to alter the food package once benefits have been issued, and you can use Recover to exchange one item for another. However, we have seen a couple of instances in which all food items issued for future benefits have been recovered and not replaced while adjusting benefits.
- Recover is used to remove a food item or formula from the benefit so that another food item or formula can be added.
- Void allows you to remove all food items, setting their quantities to 0 for that issuance.
Best practice: You should never recover all food items/formula on future benefits so that the quantity issued is 0. If future benefits are not being reissued, and you want their quantities to be zero, you should void the benefits.
Adjusting Formula
The Adjusting Formula in WINNIE (PDF) document found on the WINNIE Training page provides this same information for training purposes.
Overview
When adjusting Concentrate or RTU/RTF formulas in Adjust Benefits, WINNIE suggests extra cans. This is not a bug and works similarly to HuBERT, except that in WINNIE you can see the extra cans because all of the calculations occur on one page and aren’t broken into multiple steps.
Although WINNIE will not allow you to issue more than the Food Item Limit for an individual formula (for example, 31 cans of 13 oz concentrate), if the number of calculated ounces left are greater than the number of ounces in one can/container, WINNIE will indicate that these extra cans/containers are available.
Rules of Thumb
There are common sense Rules of Thumb that you should follow when adjusting formula:
| Formula Reconstitution | Returned + Recovered | What to Do |
|---|---|---|
| Same | Some (Partial) | Issue the same number of cans/containers as were returned + recovered. |
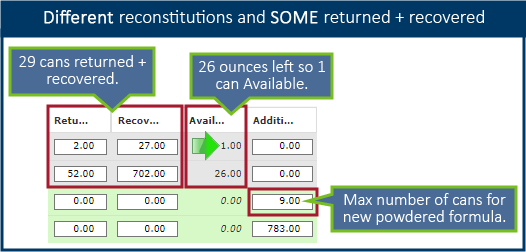
| Different | Some (Partial) | Issue the number of cans/containers suggested by WINNIE. Never issue the Available cans in the original formula’s row. |
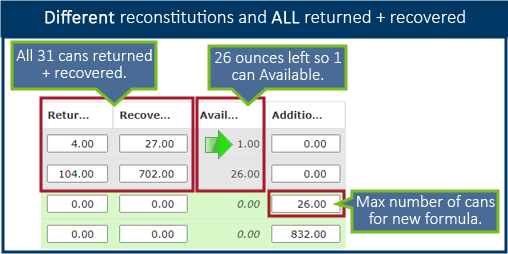
| Same or Different | All | Issue the number of cans/containers suggested by WINNIE. Never issue the Available cans in the original formula’s row. |
Examples
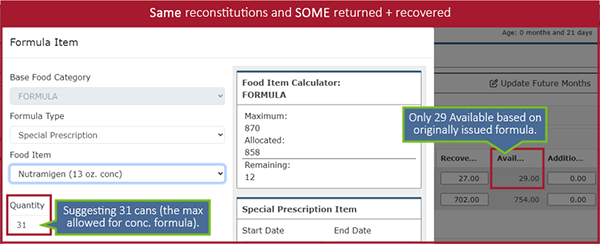
Example #1 – Same Reconstitution with Some Returned/Recovered
Exchanging concentrate for concentrate where some of the original formula (gray row) is returned and/or recovered:
Example #2 – Different Reconstitution with Some Returned/Recovered
Exchanging concentrate for powder where some of the original formula (gray row) is returned and/or recovered:
Example #3 – Different Reconstitution with ALL Returned/Recovered
Exchanging concentrate for RTU/RTF where all of the original formula (gray row) is returned and/or recovered:
TIP! Instead of using Update Future Months, which is more advanced functionality, simply void future months, assess food prescriptions and add as appropriate, then reissue using Issue Benefits.
Explanation of How WINNIE Works when Adjusting Formula
Read if interested in understanding why Adjust Benefits works like it does.
In Adjust Benefits, when exchanging formula, WINNIE looks at two things: the Food Item Limit, or maximum number of cans that can be issued for a specific formula, and the Base Food Category Limit for all formula.
The Federal Regs determine the Base Food Category Limits and there are two methods for determining the reconstituted limit for monthly formula issuance. The first is the Full Nutrition Benefit, which provides a reconstitution limit that is the same for all formulas. The second is the Maximum Monthly Allowance (MMA), which provides a different reconstitution maximum based on the type of formula: powder = 870, RTU/RTF = 832, and concentrate = 823. WINNIE uses the MMA because of how Minnesota WIC issues formula.
There is only one Base Food Category Limit for formula despite there being 3 different reconstitution maximums for MMA. Since the maximum formula amount must be used, we use 870, the limit for reconstituted powder. This is the Base Food Category Limit for all formula.
When adjustments are made for concentrate or RTU/RTF, because the limit is 870 when the reconstituted amount is calculated, there can potentially be 2 extra cans of concentrate and 1 extra container of RTU/RTU that may be suggested as available.
WINNIE math:
13 oz Concentrate
- 31 cans concentrate x 26 reconstituted oz per can = 806 fluid oz.
- 870 – 806 = 64 oz.
- 64 / 26 = 2 cans with 12 ounces left over
32 oz RTU/RTF
- 26 containers RTU x 32 reconstituted oz per container = 832 fluid oz.
- 870 – 832 = 38 oz.
- 38 / 32 = 1 can with 6 ounces left over
Benefit Issuance
Create Food Package for 18-Year-Old Non-Breastfeeding Women
WINNIE requires a food prescription be created for the 18 thru 65-year age category for non-breastfeeding women. If a food prescription with an Effective Date for her 18-year birth date does not exist, a message displays that reads “error loading the data” when trying to issue the benefits.
Best Practice: Create a food prescription with an Effective Date of the 18th birthday for non-breastfeeding women not yet 18 years old.
Issue Last Set of Benefits for Breastfeeding Women First
If baby has turned one year old and a breastfeeding mom has not yet received the last set of benefits that she is eligible to receive (Printed First Date to Use before Cert End Date), you should issue her last benefits before updating the Breastfeeding Verified Date. This date only needs to be updated before issuing benefits to the infant/child. But once it is updated, the system will terminate mom, and you may or may not be able to reinstate her to be able to issue her last set.
Best Practice: Issue a breastfeeding mom’s last set of benefits before updating the Breastfeeding Verified Date.
WINNIE Always Maintains Benefit Cycle
Once a household has a benefit cycle, WINNIE will always maintain that cycle even if all members have been terminated or are no longer eligible and then return to the program.
Cannot Issue Benefits to Infant Before First Birthday
In WINNIE, a food package based on an age category change cannot be issued until the date of that birthday. The birthday must be on or after the Printed First Date to Use (PFDTU) to receive the food package. This is most impactful for infants turning one year old. They will no longer be able to receive the child food package unless the PFDTU of the benefit set is on or after their first birthday.
Calendars
Creating Calendars Can Take Longer in Month View
When creating calendars, if your agency has a lot of resource schedules, you may find it takes longer to open the Calendar, especially since it opens by default in Month view. This is a work-around to help it open faster:
- In the Clinic Module, select your smallest clinic from the dropdown in the header.
- Return to the Module Launcher and click the Agency Administration button.
- Select Resources Schedules from the sidebar.
- Select Day view (to the right directly above the calendar).
- Select the larger clinic you want to create schedules for.
- Add your schedules/blocks.
- After making your calendar changes, click the Month view to review your changes if desired.
Edit Resources to Find More Quickly in Lists/Dropdown
One of the staff at the Pilot agency told us she edited her resources so that it was easier to select them from lists or dropdowns using hot keys. In HuBERT, all of her resources started with their position followed by their name (ex: RD-Carly). In WINNIE, she edited them so that the resources started with their name then position (ex: Carly-RD). This way, she can just type the first letter (ex: C) to quickly filter and select the resource (ex: Carly) when scheduling or creating her calendar.
Certification Mode
Bloodwork Requirement
In Certification Mode, a red box shows next to the Bloodwork requirement for all participants. For most participants, you will need to select the “CPA Determined not due for bloodwork” option when not completing the requirement. However, for infants less than 9 months old for whom Bloodwork is never required you will be able to complete the cert without opening the Bloodwork page or getting a checkmark.
Switching Folders
In Certification Mode, you are still able to switch to another household member’s folder. When you select them from the Participant Menu, WINNIE will automatically close Certification Mode and open the other member’s Participant Folder. You can switch back to the member who was being certified and select Resume Certification to open Certification Mode again.
Do Not Have to Save Auto-Generated Food Prescription
In Certification Mode you do not have to save the auto-generated Food Prescription. You are required to open the Food Prescription page since that initiates the creation of the food prescription, but once the page has been opened the system will create the food packages for any age category changes occurring during the next certification period, the Save button will be disabled unless any changes are made to the default food package, and you will receive the checkmark.
Food Prescription
Modify Food Prescriptions Faster!
When creating food prescription in WINNIE, you can double-click on the row to open the Edit card, you do not have to select the row then click the Edit button. You can also edit and delete more than one food item, so make all of your food prescriptions edits at one time, before clicking the Save button.
Logging in
Login Times Can Vary
The amount of time it takes to log into WINNIE can vary from day-to-day and can sometimes take longer. It can be impacted by a few different things, including backend reference changes that are being synced, software upgrades, changes to your agency’s IT firewall settings, and your agency’s VPN.
Toggle on Remember Me
As long as you are not sharing your computer with someone else during the day, on the Multi-Factor Authentication (MFA) page, you can toggle on “Remember Me” when logging in. Once toggled on, the system “remembers” you for the current date and does not require a new MFA code if you log out or your session ends, and you have to log back in. This “remember me” expires at midnight each night. It is also browser-specific so if you change browsers during the day, for whatever reason, you will need to enter a new MFA code and toggle on Remember Me for that browser.
Navigation Shortcuts
The Enter key on the keyboard can be used for many navigational shortcuts.
- Alerts modal – once you’ve reviewed the alert and if you don’t need to delete any of them, you can simply press the Enter key to close the Alerts modal.
- Demographics page – after any change on the Demographics page, you can press the Enter key to automatically save the change (as long as there aren’t any required fields that must be completed).
- Capture Signature for Card modal – you can press the Enter key to automatically select the correct button (either the “Capture Electronic signature” button when the modal first opens or the “Save Signature” button once the participant has signed the signature pad).
- Income page – after entering an Adjunctive Eligibility income, you must click the Update button. However, you can also simply press the Enter key and the Update button will be automatically selected by the system. The Pilot staff also found that you can click anywhere inside the Adjunctive Eligibility card and that will also automatically select the Update button.
- Search – after entering any search criteria, you can press the Enter key to start the search instead of clicking the Search button.
Participant Folder
More than One User in Same Folder
There is no notification if another person opens the same Participant Folder you are currently working in. In general, having more than one person in the same folder is discouraged since it can result in data-syncing issues.
However, folders are locked if benefits are being issued or adjusted and you try to open the same page (Issue Benefits or Adjust Benefits, respectively) in another member’s folder.
Prescreen
Duplicate Participants
Before creating any new records, you should always first search for an existing participant record. A couple of tips:
- Always ask if anyone in their family has ever received either formula or foods from MN WIC before.
- Search using just a couple of letters from each name or just the initials and their date of birth.
- It is possible their existing record has a different last name.
- Some cultures reverse the month and day when providing their birth date.
- If adding to an existing household, click the Household ID link to display all existing household records.
Potential Duplicate Applicant/Participant Modal
This only displays after completing the Prescreen if the first name, last name, and date of birth are an exact match. It provides the option of continuing to create the new participant record or to use the existing record.
Potential Duplicate Participants (Agency Admin)
The Potential Duplicate Participants function displays under Clinic Actions if you have the WINNIE Agency Admin role. This allows you to compare records associated with specific State WIC IDs or to run a State Defined Comparison, which compares records statewide and lists those with an exact match of the first 3 letters in the first and last names, date of birth, and gender.
However, there is currently a bug (#240307) associated with this whereby the criteria comparing the first 3 letters of the names is case sensitive. Since WINNIE does not force all capitals, allowing you to use sentence case when adding names and addresses, if the names aren’t type in all caps, the system won’t recognize matching records as potential duplicates.
This bug will be fixed in the next Release, 3.4.0, tentatively scheduled for early 2025. At that time, your agency may see an increase in potential duplicate records when the system is fixed and starts matching regardless of case.
If this is concerning, you can use the Caps Lock key to enter an applicant’s name in capitals.
Risk Factors
Risk Factors Assigned During Nutrition Assessments
In WINNIE, any risk factors assigned during a Nutrition Assessment contact will display in the Assigned Risk Factors grid but will not display in the Modify Risk Factors modal where CPA-assigned risk factors can be added and removed. If assigned during a Nutrition Assessment contact, the risk factor can only be deleted or resolved on the date it is added and only by editing the Nutrition Education contact.
Scanners
Plug Directly into Laptop
Like signature pads, scanners should also be plugged directly into the laptop and not the docking station.
WINNIE Automatically Performs Two-Sided Scanning
If you scan a document that has information on both sides, WINNIE automatically scans both the front and back when the document is run through the scanner. In some cases, only one side is relevant (such as may occur with Rights & Responsibilities that have English and another language on the other side). WINNIE does not have an option for one-sided scanning. It does scan to PDF, so some staff may be able to delete the second page. In general, this shouldn’t be necessary. However, you do need to be aware in case there is private data that should not be scanned into the system on the backside of a page you are scanning.
Scheduler
Open Scheduler Icon Not Displaying on Participant Card
When you click the Household ID link on the participant card on the Search page, WINNIE automatically selects Statewide and searches the Statewide database for all members of the household. While Statewide is selected, you cannot open the Scheduler and the Open Scheduler icon no longer displays on the participant card. If you only want all members of the household that belong to your Agency (and not those in Agency 88), you can simply click the Agency button and click the Search button (or press the Enter key). Once no longer searching Statewide, the Open Scheduler icon re-displays on the participant card.
Changed Clinic View is Retained
This is a reminder that when viewing other clinic schedules on the Scheduler page, if you change the Clinic at the top of the page, WINNIE will retain the newly selected clinic when you go back to the Participant Search page.
Clinic Schedule for Staff
You can generate the clinic schedule for a single resource on both the Scheduler page (opens in Participant Folder) and the Clinic Schedule page (accessed from the Participant Search page). Click the “Generate Clinic Schedule” button then hover over the dropdown and click the x in the bottom right corner to remove all resources scheduled for that date that are default populated. Click the dropdown or use hot keys to select the desired resource then click the OK button. The “Appointment Listing for
Screen Real Estate
Zoom Settings
WINNIE uses a lot more screen real-estate and requires a lot more scrolling when at 100%. You may want to change your browser zoom to 67% or 75% for ideal viewing of the different WINNIE pages. To change your zoom, once in WINNIE, click the ellipses icon (3, either horizontal or vertical, dots in the top right of the browser window) to open the Settings menu. Click the minus in the zoom section to decrease the size of the page content.
Task Bar Placement
The navigation sidebar on the left of each page in the Participant Folder is very long. If you are having trouble seeing the Begin Certification option at the bottom of the sidebar, you can collapse any of the sections of the sidebar OR you can try moving your taskbar from the bottom of your screen to the right. To do this, click on your taskbar and make sure there isn’t a checkmark next to “Lock all taskbars”. If there is a checkmark, click it to de-select it. Then simply click and drag your taskbar to the right edge of your monitor to position it vertically on the right. To make sure it doesn’t move, right-click and select “Lock all taskbars” to lock it to its new position.
Vertical Scroll Bars
You do not always have to mouse over to vertical scroll bars to use them if your mouse has a scroll button between the left and right click buttons. If you have this button and click on the page, you can use the mouse button to scroll up and down instead of mousing over to the scroll bar. (NOTE: the scroll button has two states: multiple lines or one screen at a time. “Multiple lines” is the default and is slower while the second makes the mouse much faster. You can toggle between the states by pressing the button.)
Session Settings
Timeout is 30 Minutes
A browser session is started every time we log into WINNIE. Our sessions are limited to 30 minutes unless “server calls” occur. A server call is any activity that saves data or changes the page, such as:
- Participant searches
- Opening participant folders
- Selecting different pages (ex: Health Information, Blood, Income, etc.)
- Saving changes
When a server call occurs, the system resets the clock for our session, allowing us to continue using WINNIE without automatically logging us out. Typing information into fields on a page or into a note is not a server call. Data entry must be completed and saved within 30 minutes, otherwise, the session will time-out and the data will not be saved.
Signature Pad
Plug Directly into Computer
In general, we have found that the signature pad works best when plugged directly into the computer, as opposed to when plugged into the docking station (or port replicator).
Buttons Reversed on Signature Pad
When signing the signature pad, the Cancel and OK buttons have been reversed. The OK button being on the right in WINNIE may be more intuitive for users.
WINNIE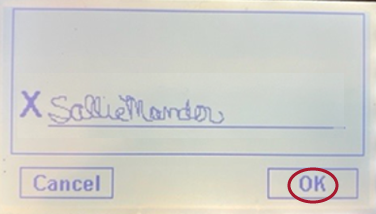
HuBERT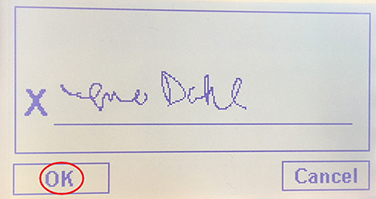
SWIPe
Tips for successfully using SWIPe
- When SWIPE opens it displays a message “waiting for connections.” It will not indicate it has connected until something occurs that requires SWIPe, such as collecting a signature or scanning.
- Ensure before your rollout that only one version of SWIPe is installed. During Pilot, one of the most common issues was having more than one version of SWIPe installed, which caused it not to work correctly.
Training Environment
Searching for Participants
The Training Environment is a desensitized database. This means that much of the data is scrambled and both the first and last names are truncated to 3 letters each. WINNIE does exact match searches by default so if searching for specific participants in your agency by their full name, there won’t be any matches, and no records will display. Instead, when searching by name in the Training Environment, type just the first few letters or initials.
Where is...?
Where is the Household ID?
In WINNIE, the Household ID no longer displays at the top of each page of the Participant Folder. It can only be found in the following places:
- Demographics page at the top of the Household Demographics panel on the left.
- Manage eWIC Account page to the right of the Primary Cardholder.
- Participant Menu, which can be opened on every page. The Household ID is found at the bottom next to “Other Household Members”. However, if there is only one member in the household, the Household ID does not display in the Participant Menu.
- Appointment Details modal. If appointments are scheduled for individuals, the Household ID (and all other appointment information) is found by single-clicking on the scheduled appointment. For Household appointments, the Household ID displays on the scheduled appointment.
Updated 7/16/24 - Where is Add Member?
We can add a member from both the Participant Search page and from within the Participant Folder. There is an Add Member icon on the participant card in Participant Search, as well as the first option in the Participant Menu in the Participant Folder. Two notes: 1. We can Add a Member to a participant who still belongs to Statewide in WINNIE. 2. If there is only one member, such as a postpartum woman, and you need to add the infant, you should do so before starting Certification Mode for mom. Once the certification has been started, Add Member is disabled, so you can’t prescreen the baby and you won’t be able to link mom and baby during mom’s cert. You can only link once the baby has been prescreened.
WIC Card
Do Not Automatically Deactivate Card if Reassigning New Card
In WINNIE, deactivating a WIC Card before replacing it will cause the PIN NOT to transfer to the new card. Instead, you can simply replace a new card if their current card is lost, stolen, damaged, or unusable, and only deactivate if someone is in possession of the card that should no longer have access (ex: foster care situation or change in representatives). When replacing, the new card simply overwrites the current card, and the PIN is automatically transferred.